Review: An In-Depth Analysis of Celtic vs. Aberdeen
Part 1: A 1-5 Defeat on Home Ground
We turn our attention to Scotland, where Aberdeen FC ended an impressive 35-year drought to finally celebrate another title. At the prestigious Hampden Park in Glasgow, the Dons delivered a thrilling performance: after a 1-1 draw in regular time, they fought their way through extra time and ultimately secured victory with a nerve-wracking 4-3 penalty shootout against Celtic Glasgow.
What makes this triumph even more remarkable is the backstory. Just ten days earlier, the same teams faced off in the Scottish league – a match Celtic decisively won 5-1 at Pittodrie Stadium. All this and more is explored in detail in this article.
Celtic Defeats Aberdeen with a Resounding 5-1 Victory
Basically, it seemed clear from the start: Celtic would win the cup! And that’s exactly how they played – dominant, with a lot of possession, so the action mostly stayed in one half of the field. But before we dive deeper into the final, let’s take a look back at the 5-1 game in the league ten days earlier. What problems did Aberdeen face in that match? And how did they respond in the final?
Ten days earlier: Aberdeen faced Celtic in a very important game for them. It was about qualifying for European competition, and their direct rival Dundee United was also playing on the 37th matchday, the second last game of the season. While Aberdeen played against Celtic, Dundee United had to face Rangers – a game they lost 1-3.
The situation promised an exciting final on the last matchday, where Aberdeen and Dundee United would fight directly for the important spot. But Aberdeen wanted to set the course early against Celtic and gain an advantage. Coach Jimmy Thelin therefore put his main players on the field to secure the crucial points.
Unlike Aberdeen, Celtic had already won the league title early and used this game to reduce the load on their key players and give the backup players some playing time. Coach Brendan Rodgers rotated the squad heavily, giving several young talents and squad players the chance to prove themselves. Among them was Kenny, who got to make his long-awaited debut in the starting lineup.
Despite many changes in their lineup, Celtic took the match seriously from the start. They began dominantly and controlled the game with a lot of possession. Although they didn’t create many clear chances early on, from the 20th minute they started to find their rhythm.
As the game went on, Celtic’s attack improved noticeably. In the first half, they had an xG (expected goals) of 1.56 and held over 70% possession. This dominance continued in the second half, and by the end of the match, their xG reached 3.61.
Aberdeen’s high press
Aberdeen had trouble defending against Celtic’s attacks right from the start. Celtic played their usual 4-3-3 formation when they had the ball. Aberdeen used a high press with an attacking 4-2-4 setup to put early pressure on Celtic’s build-up play. But when they had to fall back into their own half, they switched to a compact and defensively strong 4-4-2 with a flat line to close the spaces well.
In the high press, Nisbet and Gueye played up front, with Gueye focusing especially on stopping the midfielder McGregor, and later Bernardo, from getting involved. Alongside them, Keskinen was on the left and Morris on the right, forming the attacking four. Right behind them, Palaersa and Clarkson helped cover the midfielders Bernardo and McCowan.
The back four—Jensen, Dorrington, Knoester, and Shinnie—were able to work in a +1 overload against Celtic’s three attackers.
Aberdeen’s pressing was more cautious; they didn’t try to win the ball immediately but waited for the right moment to press. It was especially important to take McGregor out of the game: the striker away from the ball marked him closely, while the striker near the ball pressed Celtic’s center-back.
The goal was to force Celtic to play to one side of the field. Once they did, the striker near the ball closed down Celtic’s near center-back, while the striker away from the ball stayed focused on McGregor. The far center-back was marked by the far winger.
This setup aimed to create a one-on-one situation with a +1 overload in the last defensive line near the ball—accepting that the full-back on the far side would be left open. This pressing strategy sometimes led to good pressing chances on the right side.
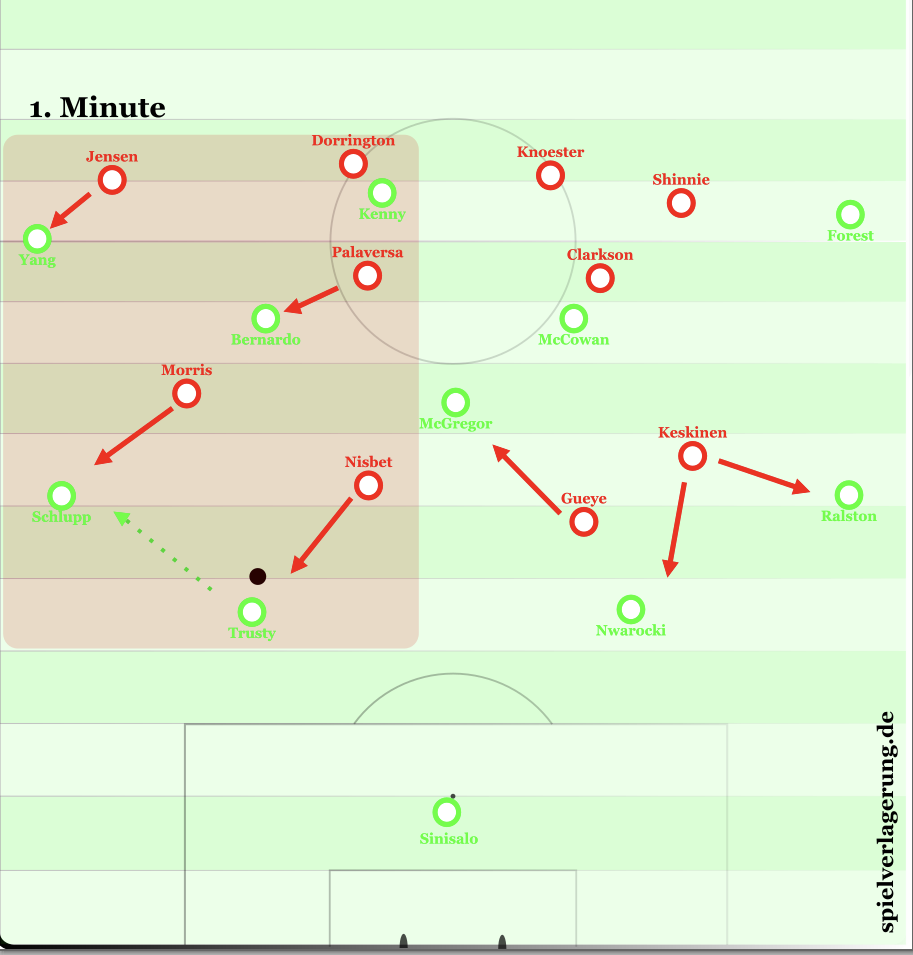
Here is a picture showing a situation that was rare in the early stages: Aberdeen uses a cautious press with the striker near the ball to guide Celtic to the wing and create a one-on-one situation there.
Aberdeen often pushed the play toward Celtic’s left side. Keskinen frequently triggered the press by closing down the pass to Celtic’s right center-back. The likely plan was to put pressure on the young Nwrocki and take advantage of Keskinen’s strong pressing skills.
Keskinen worked very smartly and effectively with his defensive positioning, which was crucial because Aberdeen’s front line was outnumbered—effectively 4 against 5: the back four and the number six against Aberdeen’s front four—in their press. With his clever positioning, Keskinen tried to make sure the free player, in this case the full-back, couldn’t receive the ball.
In contrast, Morris was less effective in pressing on the other side.
Celtic finds the free player
No matter how good Aberdeen’s pressing sounded in theory, it showed clear weaknesses in practice. The team couldn’t put enough pressure on the player with the ball because Celtic was repeatedly able to smartly bypass the press and free themselves from pressure.
Celtic showed excellent ways to break Aberdeen’s press in this game. Their approach to positioning was very similar to principles seen under Roberto De Zerbi. Basically, Celtic’s strategy was to lure Aberdeen into pressing by using targeted passes, frequent sideways passes, or tempting balls into pressure. Once Aberdeen triggered the press, Celtic played the ball back in the direction the pressure originally came from.
This tactic exploits a key weakness in Aberdeen’s pressing: when a team presses with fewer players and one player triggers the press, there is always a free player left open in that area.
Celtic repeatedly took advantage of this by using smart lay-offs to find the free player. This player could be the number six, Callum McGregor, or the nearby number eight, who at those moments offered a short passing option to escape through the small or big triangle. The goalkeeper played a key role here: he was the free player since he had no direct opponent and could easily receive a sideways pass.
Because of this, the player who originally triggered the press from the center-back—often Keskinen—had to run past the goalkeeper. This left both the center-back and the full-back without a direct opponent. In this way, Celtic was able to free the center-back with a clever lay-off.
This strategy worked especially well on the right side because Keskinen often triggered the press. As a result, he either left the full-back or, if he pressed the goalkeeper, even both the full-back and center-back without a direct opponent.
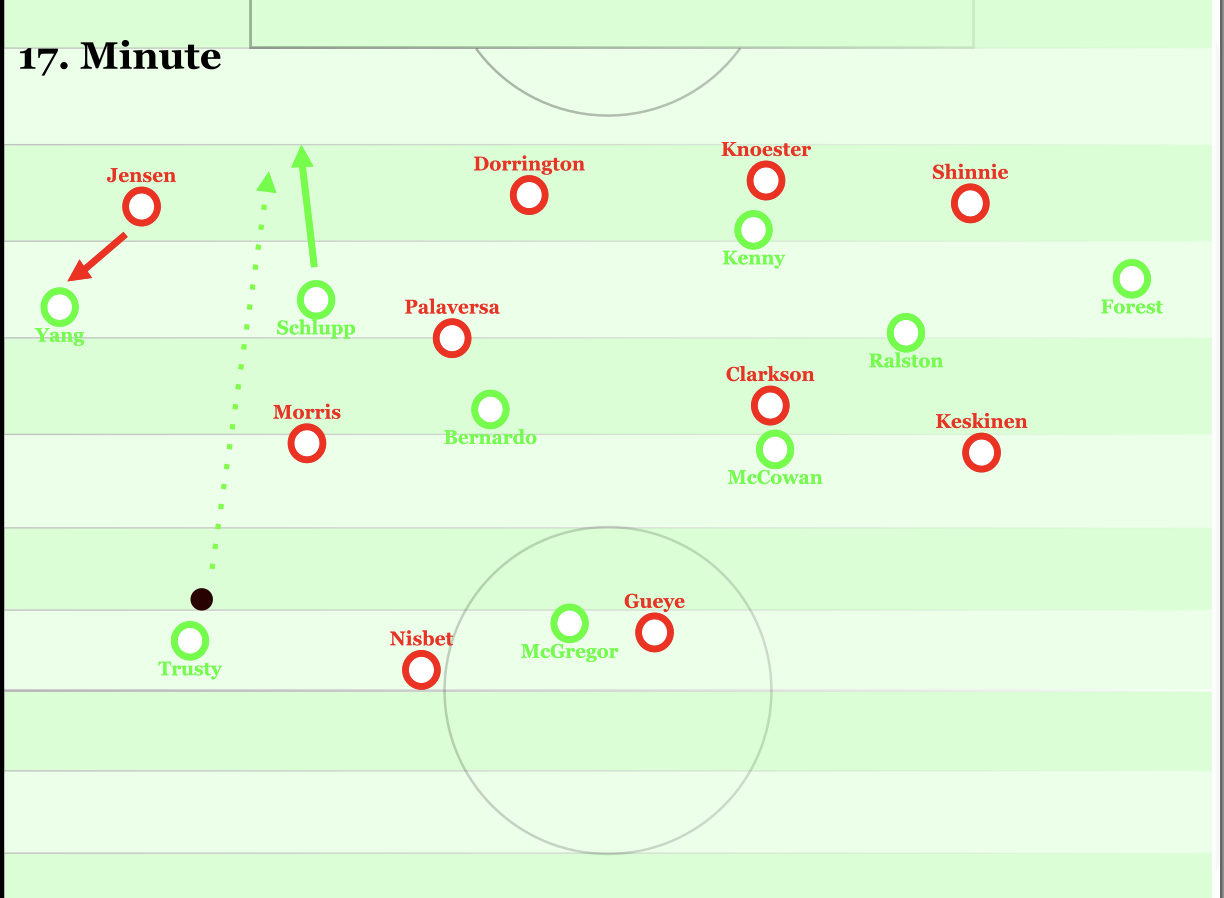
No access in the high press: Keskinen closes down Sinisalo. Celtic escapes the pressure through a deep-lying number eight and is able to gain ground.
Celtic also took advantage of the fact that the far winger often played a baiting role and pressed the far center-back. With a precise sideways pass, they drew this player into the press, then quickly played a simple ball out wide to the full-back, creating an effective way out of the pressure.
A key detail in this approach was the movement of the center-back. He deliberately moved toward his own goal, which lengthened the pressing path for the opponent. This gave Celtic the necessary time and space to play out of the pressure in a controlled and effective way.
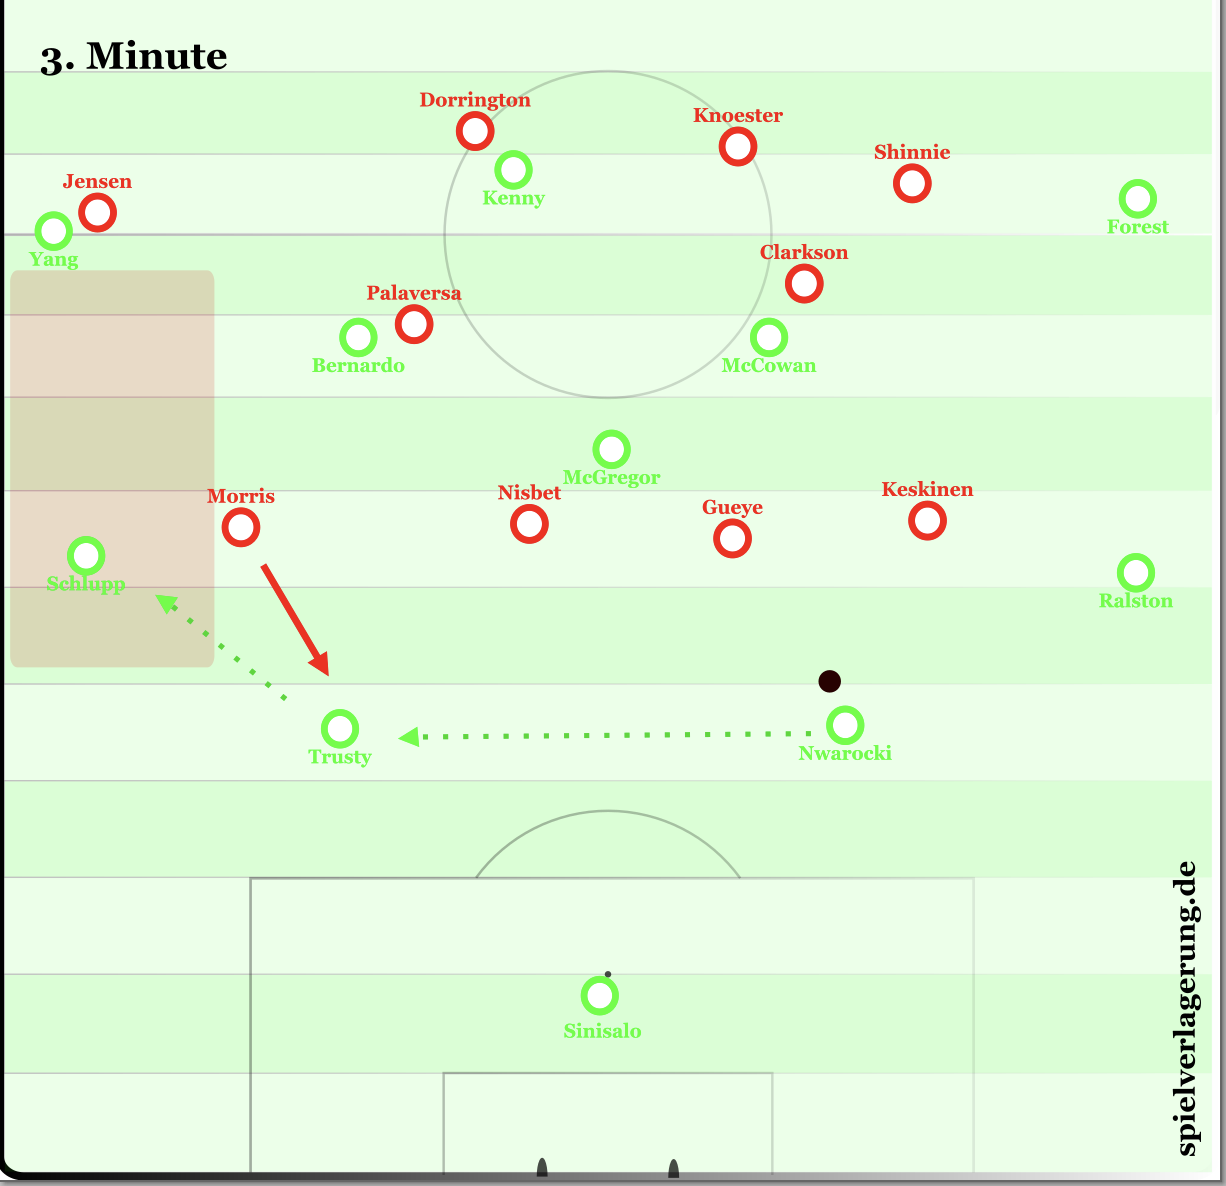
Here is another way Celtic was able to break the press. Morris pressed Nawrocki’s sideways pass to Trusty with poor timing and approach angle. Trusty was able to escape the press easily with a simple pass to Schlupp.
Because of this, Aberdeen couldn’t apply effective pressure on the ball, allowing Celtic to create overloads on the wings and repeatedly set up 3-on-2 situations there.
As a result, Aberdeen rarely managed to win the ball dangerously in the early stages, mostly only after mistakes by Celtic. One example was in the 15th minute: Sinisalo, Celtic’s goalkeeper, was pressured by Keskinen and tried to play into the space behind through the big triangle. However, McCowan had poor timing and moved too late, allowing Clarkson to intercept the ball and give Aberdeen a chance to attack. Still, this was one of the few such situations.
Aberdeen Reacts
But shortly before halftime, Aberdeen gradually found their way back into the game through dangerous ball recoveries. Two key factors were responsible for this. First, the momentum clearly shifted to the Dons after Nisbet’s equalizer made it 1-1. Second, during a longer stoppage in the 34th minute—caused by a medical emergency involving a spectator—Jimmy Thelin made crucial tactical adjustments.
From that moment on, strikers Gueye and Nisbet took on a more active role in the press, attacking the goalkeeper with a direct but guiding approach (taking a shorter running angle). They deliberately blocked the center, forcing Celtic to play the ball to one of their center-backs. On the ball side, the striker then made a run through, while the far striker dropped back to mark McGregor. At the same time, the far winger pushed toward the goalkeeper to prevent a switch of play.
By pressing from the center and deliberately directing the play toward the inside defenders, Aberdeen gained more control. They were able to dictate the flow of the game and cut off Celtic’s lay-off passes, preventing Celtic from escaping pressure and limiting passing options to players like the deep-lying number eight.
The wingers continued to operate flexibly between two players. Their role was to apply pressure on the opponent’s fullback or Center Back when the situation called for it. However, unlike in the early stages, their approach was more restrained—they pushed forward less aggressively and took on a more cautious role to maintain defensive stability. This happened, for example, when Celtic bypassed the central striker with a lay-off pass, when the ball was played inaccurately, or when an inside defender moved wider and the central striker couldn’t close him down.
Thanks to this tactical adjustment, Aberdeen was able to get into more one-on-one situations on the wings much more frequently.
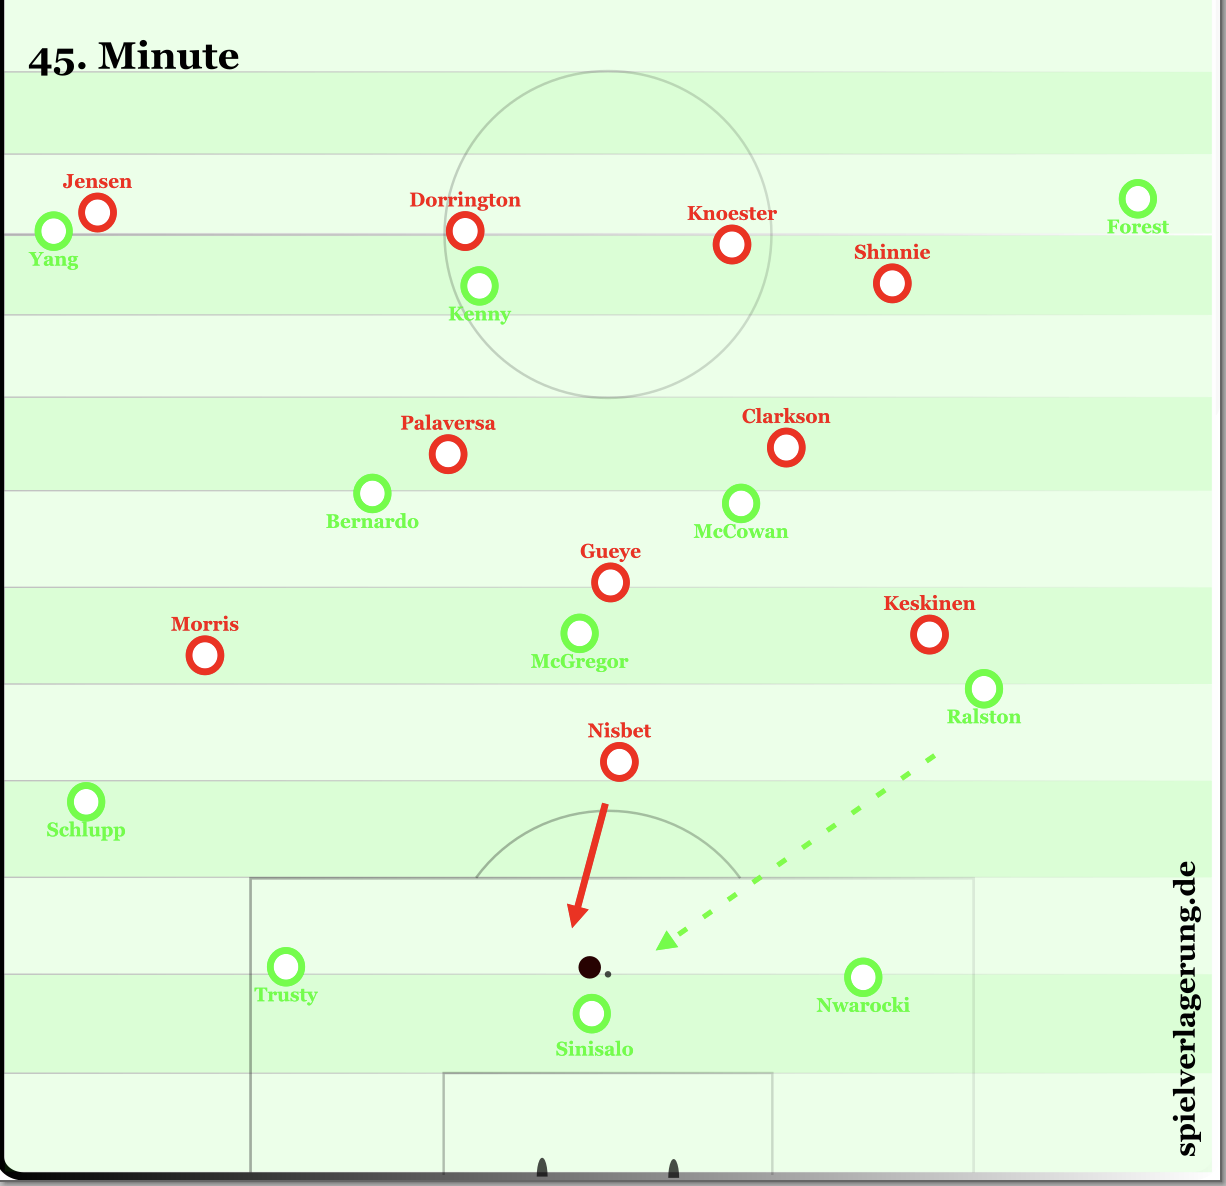
Aberdeen’s adjustment: After a back pass, it’s Nisbet—not Keskinen—who presses the goalkeeper.
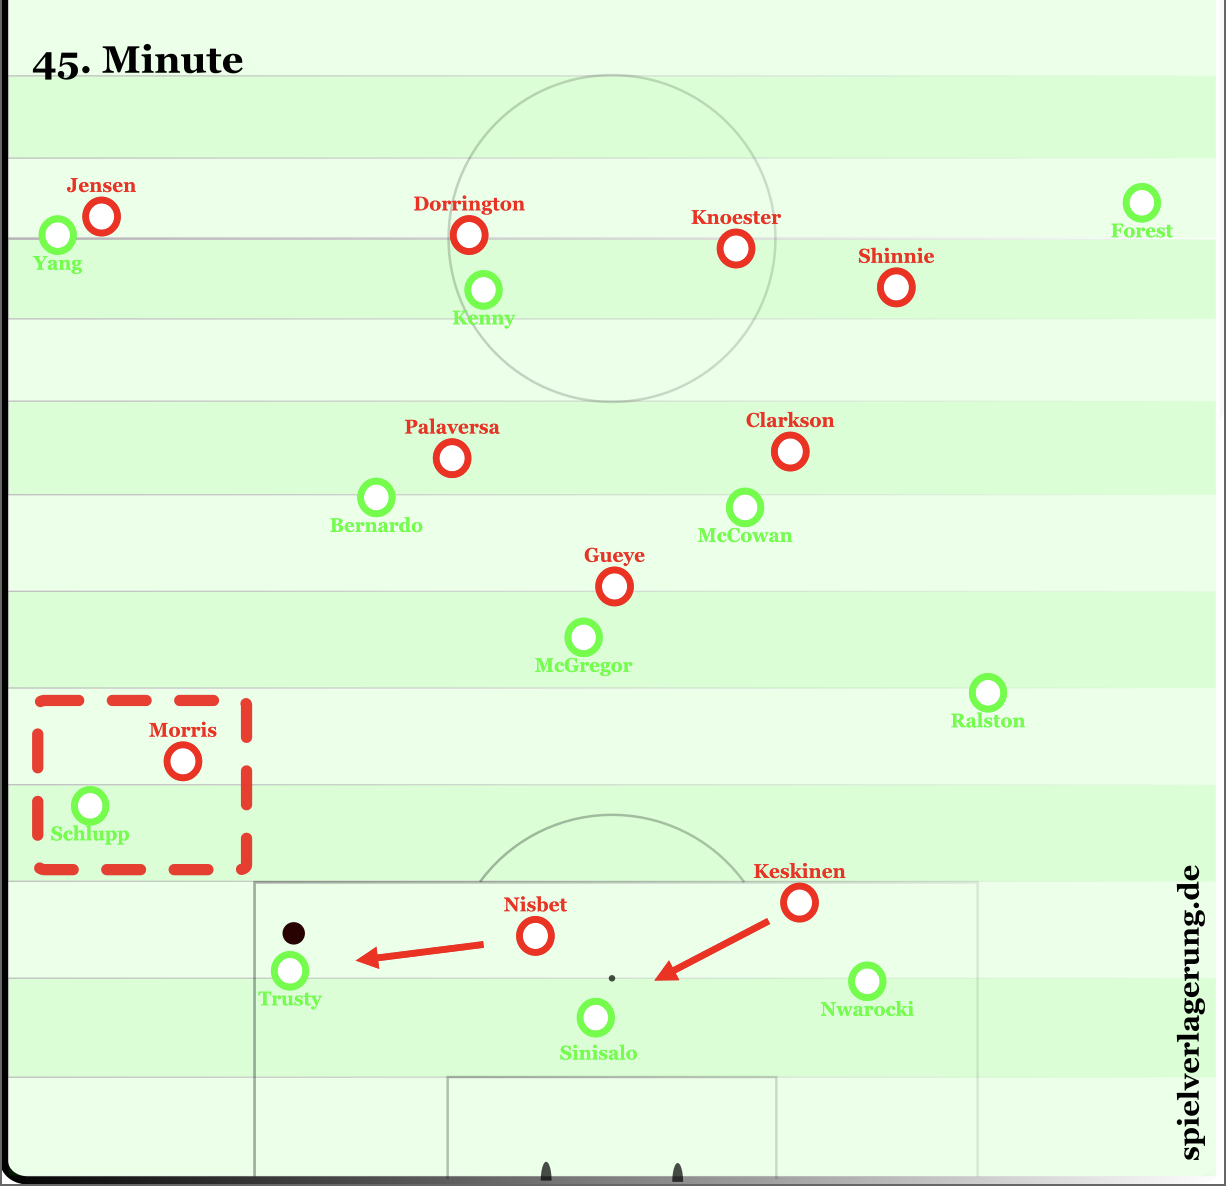
Nisbet follows the sideways pass to Trusty, allowing Morris to stay with Schlupp. Keskinen closes down the goalkeeper, keeping Celtic on the side where they created a one-on-one situation.
Another key aspect was that Keskinen acted more cautiously in the press: he avoided aggressively pressing the center-back and triggering the press himself, instead focusing more on securing the left defensive side. Gueye took on a greater role in pressuring Nawrocki, and on Celtic’s back passes, it was usually Nisbet who initiated the press. This allowed Aberdeen to create one-on-one situations on the wings and generate danger through high ball recoveries. At the same time, Aberdeen could apply more pressure on the lay-offs on the left side, as Keskinen’s more passive approach after the lay-off enabled him to specifically target the center-backs. Previously, when Keskinen pressed the goalkeeper, both the center-backs and full-backs were left without direct opponents, making effective pressing more difficult.
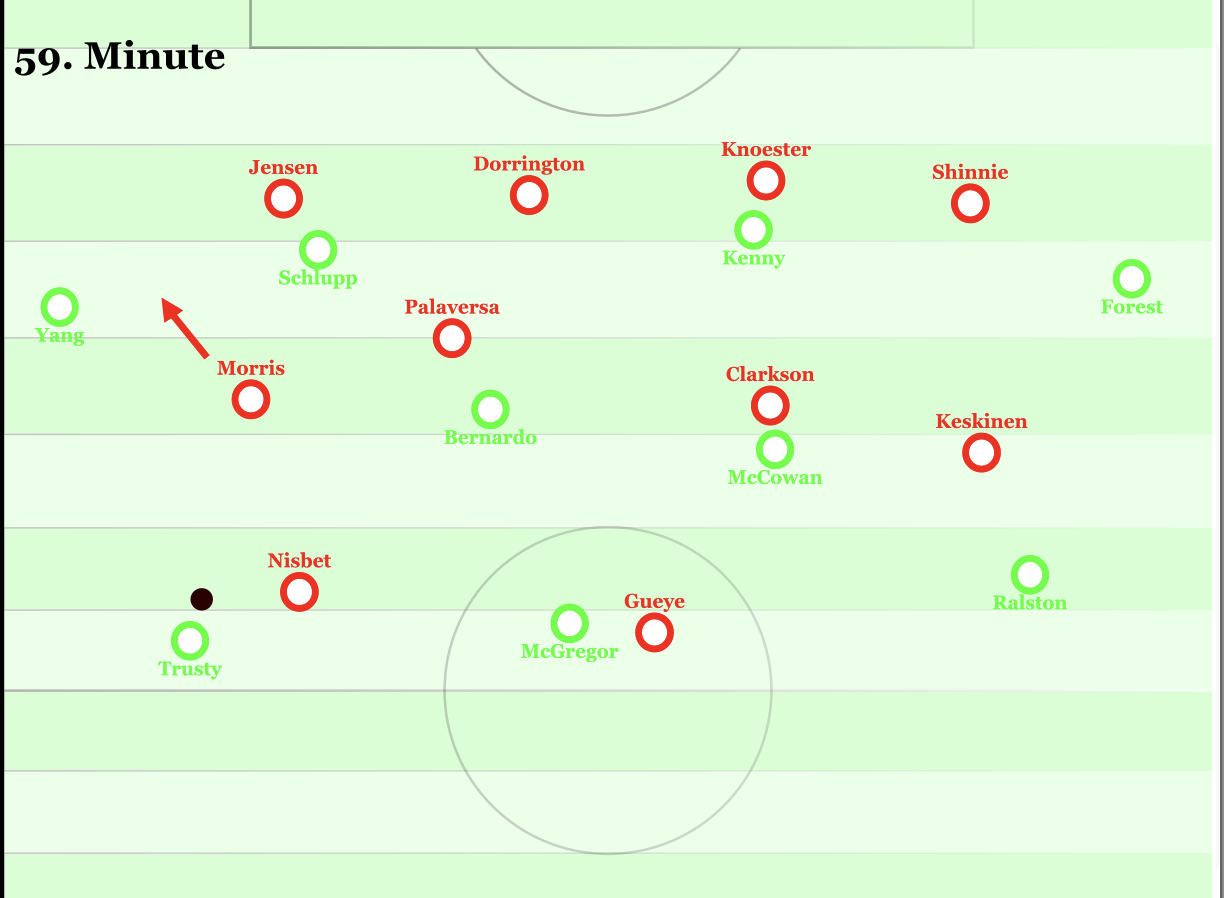
Even here, although the pressing improved, it wasn’t always effective. A clear example is the situation in the 56th minute: Nisbet pressed Sinisalo, the goalkeeper, from a very straight angle. Sinisalo passed the ball to Trusty, who positioned himself wide. This wide positioning prevented Nisbet from pressing through aggressively, unlike in previous situations. Instead, it was Morris who stepped up to press. However, since Morris also didn’t press with full intensity, Celtic was able to bypass the press with a simple pass. Aberdeen then had to stop the attack with a tactical foul by Gueye, who received a yellow card for it.
The goal for 3-1 showed that despite Aberdeen’s pressing, Celtic was still able to break free thanks to their individual and team quality—especially when Aberdeen wasn’t consistent enough in their man-to-man defense. For this goal, Celtic successfully escaped the press. Although Aberdeen managed to create a man-to-man situation on the left side, Celtic still found a way to overcome the pressure.
Celtic cleverly solved the situation through Yang, who moved inside from the wide lane to the half-space, creating an additional option and passing lanes. Bernardo, the ball-near eight, gave a short option. Palaversa defended less aggressively and less man-oriented than Clarkson did on the opposite side. This allowed Celtic to get the ball through Trusty and then to McGregor, who was free because Gueye pressed Bernardo. This was possible because Keskinen focused on the goalkeeper.
Ralston then passed the ball to Forest, who Celtic increasingly used near the end of the first half to bypass the press in one-on-one situations against Shinnie—who was clearly overwhelmed and was substituted in the 58th minute. Clarkson moved up to double-team and support Shinnie, which opened space for a return pass near the right side of the six-yard box to McCowan, who was perfectly served by Forest.
This example highlights some ongoing problems throughout the game, even after tactical changes: Aberdeen struggled with both poor execution and weak organization of their pressing. When pressing a team with one less player, it is especially important that the pressing is very precise to cut off the free player. In this case, Palaversa’s execution was poor because he did not push up aggressively enough. This caused a chain reaction: Gueye shifted focus to the number eight, which left the number six free.
The number six, in this case McGregor, can shift the play and find the free player—in this case Ralston, the ball-far side fullback.
But it wasn’t only Aberdeen’s fault. During this phase, Celtic also showed some individual mistakes, especially Nawrocki, who generally didn’t have a good game with the ball and often struggled with decision-making. For example, in the 42nd minute, he first didn’t open up the play cleanly. Then, when the goalkeeper was pressured by Gueye, Celtic solved it well with a lay-off to Nawrocki. However, Keskinen immediately applied pressure, supported by Nisbet. Instead of passing to the full-back through the nearby number eight, Nawrocki chose a risky dribble, which led to one of several ball losses.
In general, it wasn’t only Nawrocki, but also other players like Sinisalo, McCowan, Schlupp, and Kenny who made some small mistakes in the first half and didn’t always handle situations or details perfectly. This is understandable though, since the squad was heavily changed before the match and some of these players played for Celtic for the first time.
The main issue when defending deep
Because of this, the game mostly took place in Aberdeen’s half during the early stages, where Aberdeen struggled to gain control. Whenever Celtic got free from the pressure, they dropped back into a compact 4-4-2 defensive shape.
In the first 30 minutes, Celtic didn’t manage to create many clear chances by playing out of Aberdeen’s high press, but they did steadily gain ground. It was only towards the end of the first half and the start of the second half that Celtic became more effective at using the space behind Aberdeen’s defensive line to create scoring opportunities, like in the goal for 3-1 mentioned earlier.
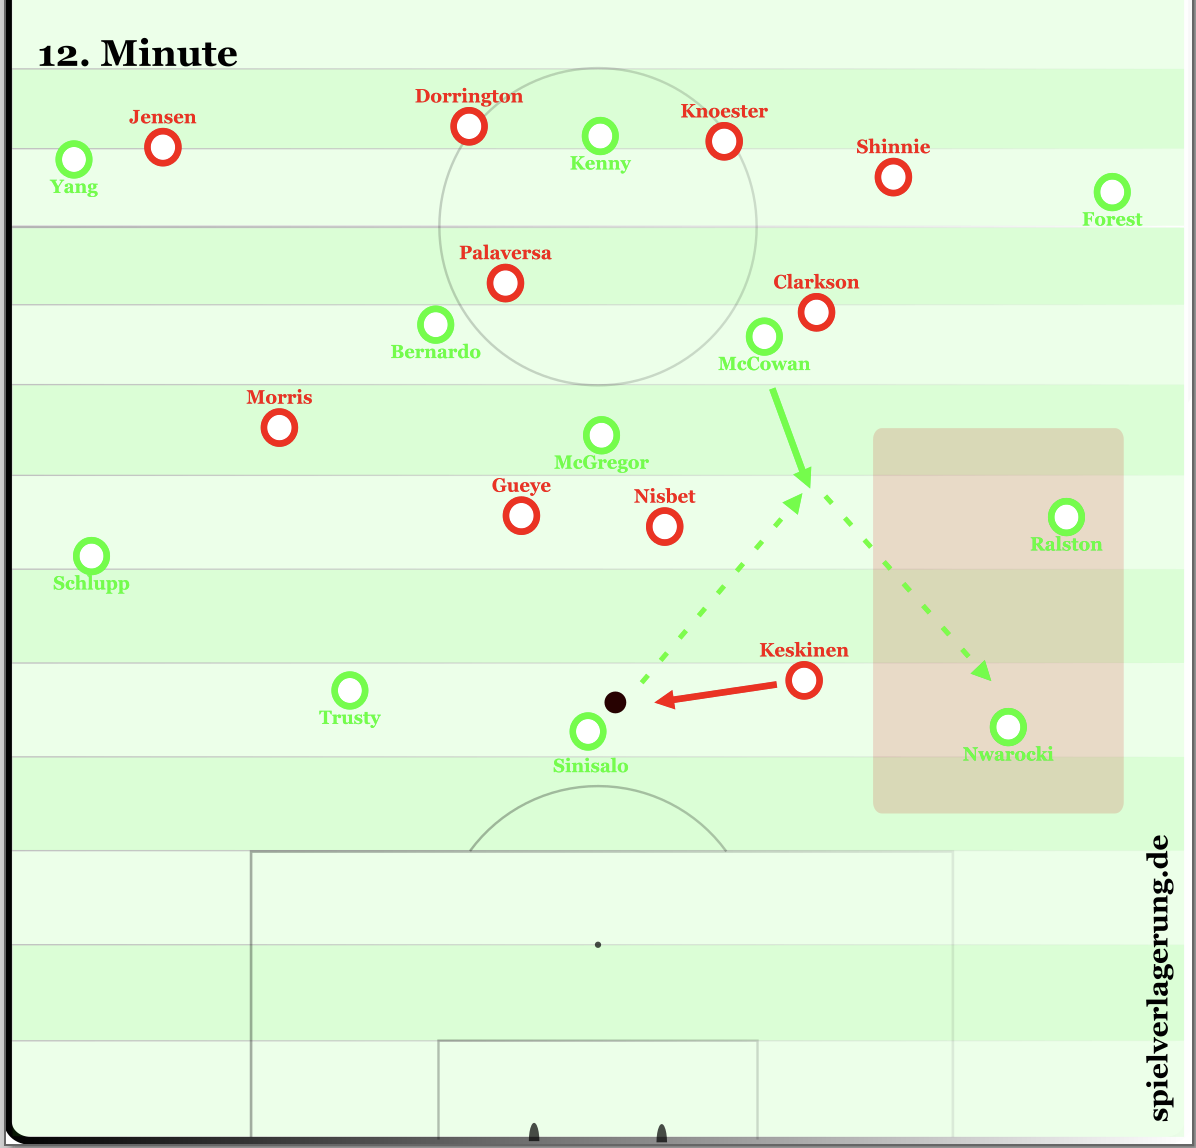
Whenever Celtic freed their full-back or center-back, attacking Aberdeen’s wide players created a 3 vs 2 overload against Aberdeen’s number six and full-back. Aberdeen’s defense tried to close spaces by falling back diagonally instead of pressing aggressively. Rarely did an Aberdeen number six step out aggressively to apply pressure. For example, in the 12th minute, Celtic solved the situation with a flat number eight, and Clarkson pressed the full-back. McGregor played a key role here, showing great game intelligence by moving into open space and creating a 2 vs 1 situation against Shinnie, Aberdeen’s full-back. The center-back couldn’t push forward because the distance was too large and he was tied up by Kenny. The lay-off pass was a bit inaccurate and was intercepted initially, but Celtic quickly regained possession and threatened with a strong counter-press.
Because Aberdeen was outnumbered on the wings, they rarely pressed aggressively with their number six or full-back after the press was bypassed.
This revealed Aberdeen’s biggest problem: Celtic repeatedly succeeded in building their play down the wings. Their focus was on using rotations and clear playing patterns in the areas close to the ball, trying to get behind Aberdeen’s defensive line — a strategy that caused Aberdeen serious problems defending against.
Celtic often used a wide player who provided a short passing option out wide. This was especially effective on the right side, where Forest regularly won one-on-one duels thanks to his dynamism and physical strength.
The Celtic full-back often moved into the half-space, which had several tactical effects. In the first half, Aberdeen usually defended this movement with their winger, who used his shadow to mark. However, this opened up the passing lane to the wide player, making him available for a pass.
The short passing option from the wide player forced Aberdeen’s full-back to often push out because the distance was too large to ignore. At the same time, the ball-side center-back was tied up by Kenny and often couldn’t push out because the distance was too large, creating large gaps between the defenders. Celtic’s full-back was then able to use these spaces with forward runs, forcing Aberdeen to defend deeper—a clear disadvantage in movement for Aberdeen’s full-back.
The main problem was: who would mark the full-back when he moved higher up in the half space. Especially after a switch of play, the distances became very large because the ball-side wide player also pulled the full-back (here Jensen) out by coming towards him.
Situationally, Aberdeen’s ball-side center-back stepped up to close the space but was usually too late. This often resulted in a 2-vs-2 situation in the box, where no Aberdeen player covered the near post, giving Celtic additional advantages inside the box.
A clear example of this approach was the goal for 4-1. Although Aberdeen managed to create a 3-vs-3 situation on the wing, Celtic resolved it cleverly. They passed the ball to Yang, who laid it off directly to Bernardo while rotating into the half-space. At the same time, Schlupp moved wide to occupy the space on the flank.
The result of this movement was that Jensen had to push far out to cover Yang. This created a large gap between the full-back and center-back – a major problem that McCowan, the far-side number eight, used excellently. McCowan, who often rotated to the ball side in such situations to create an overload, timed his movement into this space perfectly. This gave Celtic the opportunity to exploit the gap and set up Johnny Kenny, in an ideal position.
Aberdeen Reacts Also in Deep Defending
However, Jimmy Thelin and his coaching staff quickly recognized this issue and made the necessary adjustments. Instead of having the full-back push out wide as before, the wingers, Morris and Keskinen, took over the responsibility of defending the advancing wide player more often.
With this adjustment, the full-back could stay in the half-space, allowing him to better track deep runs from opponents and significantly reduce the distance between himself and the center-backs. This more compact defensive setup made it harder for Celtic to exploit the spaces as effectively as before.
In the final phase, Aberdeen attempted to defend against Celtic’s wide play as follows: it was now the winger who attacked Celtic’s wide player, while the full-back remained in the half-space. Although this approach was occasionally observed in the early stages of the match, it was employed much more frequently toward the end of the game. This suggests that it was a deliberate tactical adjustment to more effectively neutralize the increasing pressure on the flanks.
However, Celtic also found effective solutions to this adjustment. The key player in these situations was once again the far-side number eight, who often operated in the central attacking area, while the far-side full-back occupied the far-side half-space. This setup allowed the number eight to influence play closer to the ball and created greater compactness. This not only provided good support for follow-up actions but also strengthened their counter-pressing effectiveness.
In these situations, Celtic frequently managed to free the wide player with a precise pass into pressure through the far-side number eight.
The players had clear tasks: in the half-space, the objective was to take a high position in the half-space – either through the full-back or the number eight.
This forced the opposing full-back to push out wide or caused the opposing players to shift inward, leaving the flank open and binding the full-back. This opened up opportunities for Celtic to execute their rotating wing play with dynamic positional changes. The player occupying the half-space could also function as a wall player, facilitating further combinations.
The substitutions also had a significant impact. Brendan Rodgers introduced Reo Hatate for McGregor in the 61st minute, which immediately made a difference. The midfield became more versatile and especially more offensive, leading to situations—particularly when Aberdeen pressed higher—where Celtic built up play using a double pivot of Hatate and Bernardo, along with McDowen.
This chance arose because Bernardo, who from that point on consistently overloaded the ball-near side, created a 4-versus-3 situation on the left side. Due to Bernardo’s extreme ball-near positioning, Clarkson was forced out of his position and had to defend Bernardo one-on-one. As a result, Shinnie found himself in a 2-versus-1 disadvantage, since McDowen’s advanced positioning effectively tied up Aberdeen’s captain.
In general, Bernardo increasingly tried to overload the ball-near side. At the same time, Hatate repeatedly dropped into the defensive midfield zone, which often left Gueye positioned between two opponents.
Immediately after coming on, this also led to a promising attack. Bernardo created a 4-versus-3 overload on the left side. Because of his extreme ball-near positioning, Clarkson was forced to step out of his usual position and defend Bernardo directly. This left Shinnie in a 2-versus-1 disadvantage as McCowan’s high positioning effectively occupied Aberdeen’s captain.
The Final Phase
In the final phase, the game was largely decided, and the intensity noticeably dropped—unsurprising given the 4-1 scoreline in favor of Celtic. At Aberdeen, fatigue was especially evident in Morris, reflected in his reduced intensity. Additionally, the wide players Keskinen and Morris acted unnecessarily aggressive in one or two situations by pressing the central defenders again, even though this was unlikely to succeed in those moments.
In the 78th minute, the situation escalated further when Celtic found Bernardo through a layoff from Johnston, who had drifted into the half-space. Bernardo sent Idah into depth with a precise pass. This led to a duel between Dorrington and Idah, during which Dorrington committed an uncontrolled action and received his second yellow card, forcing him off the field.
Aberdeen reacted to being a man down by switching their formation to a 4-3-2. Celtic used this adjustment smartly to create overloads on the wings in a 3-versus-2 setup. On the right side, Clarkson started pressing the opposing fullback, which opened up more space for Celtic in the half-space.
In the final phase, Celtic tried to exploit these spaces with runs into the half-space, since the number eight no longer had a direct opponent. This was possible because Palaversa had to cover a long distance to close down the number eight. When he did try to do so, Celtic managed to outplay these movements with clever rotations.
An example of this came in the 89th minute: The number eight moved wide, while Kühn (substituted in) moved into the half-space as a wide player, binding the opposing fullback. Johnstone played the ball to the number eight, who rotated into the wide position and then passed it to Bernardo, who once again moved into the ball-side half-space. Johnstone took advantage of the created momentum by making a run into depth, creating an effective 2-versus-1 situation — a recurring tactical element we will revisit later.
Conclusion: What Went Wrong and What The Dons Need to Improve in the Final
Before we dive into Aberdeen’s tactical adjustments in the final, let’s first clearly and concisely list the main problems:
1. No control in high pressing:
Although there was a phase in which Aberdeen achieved some high ball recoveries, over the entire 90 minutes Celtic repeatedly managed to escape the pressing. Particularly problematic was the behavior of the wide players, who repeatedly and often too impatiently pressed the central defenders or, in the case of Keskinen, the goalkeeper. Additionally, the execution on an individual tactical level often left much to be desired. Situationally, there was a lack of precise timing and the necessary intensity—especially from Morris—to effectively apply pressure on Celtic. Celtic consistently exploited this by using lay-offs or simple passes to the full-backs to dissolve the pressure situations. As a result, Aberdeen invested a lot of effort and energy, which ultimately had little effect and remained largely ineffective, leading to numerical disadvantages and mismatches, such as on the right side with Forest against Shinnie.
2. Marking/Assignment problems on the flank:
Aberdeen repeatedly struggled with marking and positional difficulties when defending deep. Celtic’s structured style of play, often using a 2-3-2-3 formation, regularly put pressure on the Dons’ defense. Although the wide players tried to block passing lanes to the full-backs in the half-space by using their defensive shadow, this often led to assignment problems. Particularly dangerous were Celtic’s dynamic runs into depth, especially after switches of play, which consistently caused major issues for Aberdeen, as it was unclear who should pick up these runs or because Aberdeen’s winger arrived too late.
3. gaps between center-backs and full-backs
In the first half, Celtic repeatedly managed to pull the opposing full-backs out of position, creating large gaps between the full-backs and center-backs in the defensive line. They exploited these spaces deliberately, making the overlapping runs of the full-backs even more effective.
Celtic used these spaces not only through the full-backs’ runs into depth but also via the near-side and far-side midfielders, who targeted these gaps. Additionally, Kenny, the striker, showed excellent awareness of space and timing by smartly exploiting these areas. The slightly deeper positions of the wingers also helped create open 1-on-1 situations.
4. box defense
Aberdeen repeatedly showed weaknesses in their defensive organization inside the box. The near-side center-back pushed in some situations out wide but was usually too late to make a decisive intervention on the flank, leaving him in an ineffective position. This often led to a 2-versus-2 situation in the box, which Celtic cleverly exploited with a pass to the far post.
Additionally, Aberdeen was not always able to effectively cover the near-side space behind the defense. This became especially problematic when Forrest went into a one-on-one against Shinnie. In these cases, Clarkson often rushed to help, leaving the near-side midfielder unmarked and giving Celtic another dangerous option.
Here continues Part 2: https://spielverlagerung.de/2025/06/22/review-an-in-depth-analysis-of-celtic-vs-aberdeen-the-final-victory/
VR: He works in analysis for a traditional fourth division club in Germany. He has a heart for English and Scottish football and loves to analyze football games.
SR: He studies history and philosophy, which can be noticed in parts of his writing. Besides his studies, he writes opponent analyses for a Swiss fourth division club and tries to watch every possible football match.
RO: He’s certain—he loves football. For 12 years, he’s tried to look at the game from every imaginable angle, all to ultimately figure out what it truly means to love football.
Keine Kommentare vorhanden Alle anzeigen